Many aspiring fitness enthusiasts often dream of developing a powerful, aesthetic physique. For both men and women, broad, well-defined shoulders, often referred to as “next-level delts,” are a hallmark of strength and athleticism. They frame the torso, create a wider silhouette, and can dramatically transform one’s overall physical presence. Focusing on shoulder development can dramatically boost both confidence and functional strength. When it comes to sculpting these impressive muscles, few exercises are as effective and foundational as the seated shoulder press.
Understanding Your Deltoids: The Anatomy of Power 💪
Before we dive into the mechanics of building next-level delts, it’s crucial to understand the muscle group we’re targeting: the deltoid. The shoulder is a complex ball-and-socket joint, and the deltoid muscle is its primary mover, comprising three distinct heads:
- Anterior (Front) Deltoid: Located at the front of your shoulder, this head is heavily involved in pushing movements, especially overhead presses. It helps flex and internally rotate the arm.
- Lateral (Side) Deltoid: Situated on the side of your shoulder, this head is responsible for the width of your shoulders, contributing to that coveted ‘cannonball’ look. It primarily abducts the arm (lifts it out to the side).
- Posterior (Rear) Deltoid: Found at the back of your shoulder, this often-neglected head is crucial for posture, shoulder stability, and movements like rowing and pulling. It helps extend and externally rotate the arm.
During a pressing movement like the seated shoulder press, the anterior deltoids bear the brunt of the work, assisted significantly by the triceps. The surrounding musculature of the upper back and rotator cuff act as vital stabilizers, ensuring the joint operates safely and efficiently. This intricate interplay highlights why a mindful approach to shoulder training is paramount, especially for beginners.
Why the Seated Shoulder Press Reigns Supreme for Shoulder Development 🌿
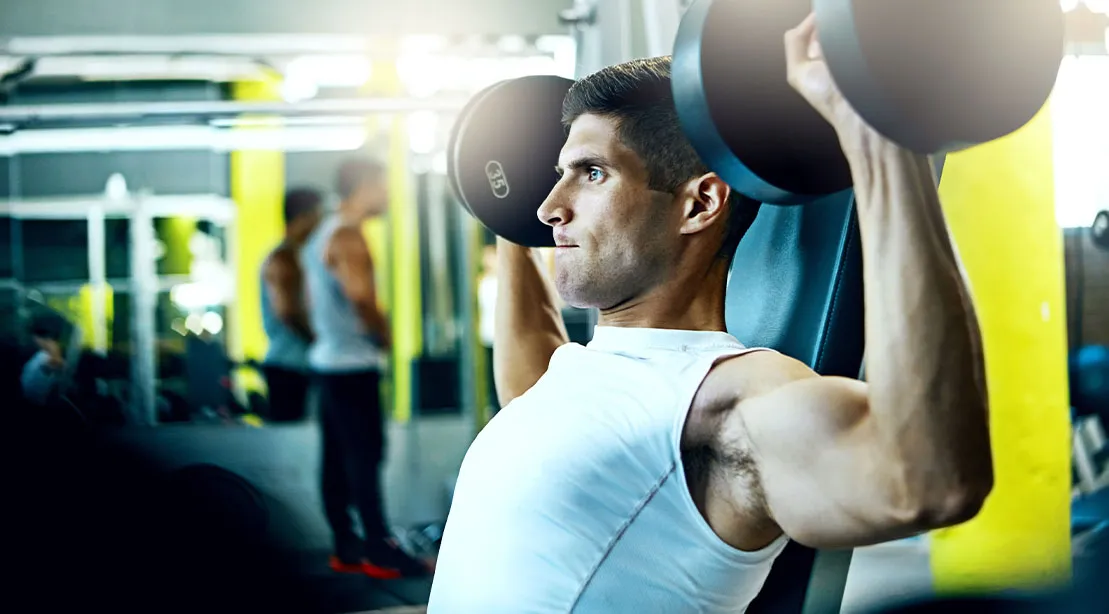
Among the myriad of shoulder exercises, the seated shoulder press stands out as a cornerstone for building strength and mass, particularly for those aiming for next-level delts. While standing overhead presses offer full-body engagement, they can often lead to excessive ‘body English’ – using momentum from the lower back and legs – which detracts from the targeted shoulder work and increases injury risk. The seated version is recommended for several compelling reasons:
- Isolation and Focus: By removing the involvement of the lower body, the seated position forces your deltoids and triceps to do the majority of the work. This isolation allows for a deeper connection with the working muscles, promoting better hypertrophy.
- Enhanced Stability: The seated position provides a stable base, minimizing extraneous movement and allowing you to focus purely on the pressing motion. This stability is crucial for lifting heavier weights safely and effectively.
- Reduced Lower Back Strain: For individuals with lower back concerns or those new to overhead pressing, the seated variation significantly reduces the strain on the lumbar spine that can occur with standing presses, making it a safer option.
- Improved Form Learning: It’s an excellent exercise for beginners to learn proper pressing mechanics without the added challenge of maintaining full-body balance. This foundational learning is invaluable for long-term progress.
The seated shoulder press allows you to concentrate on mastering the movement pattern, building the necessary strength, and protecting your joints, paving the way for more advanced variations later on.
Starting Smart: The Role of the Smith Machine 🧠
While free-weight purists might raise an eyebrow, starting your shoulder pressing journey on a Smith machine can be incredibly beneficial, especially for beginners. Stability is paramount when learning new movement patterns.
The Smith machine offers a fixed bar path, which provides:
- Predictable Movement: It eliminates the need for stabilizing the bar horizontally, allowing you to focus solely on the vertical pressing motion. This predictability helps in establishing proper motor patterns.
- Reduced Injury Risk: By guiding the bar, the Smith machine reduces the risk of wobbling or losing control of the weight, which can be dangerous when using heavy dumbbells or barbells overhead.
- Progressive Overload: It allows you to gradually increase the load and build strength in the primary movers (deltoids and triceps) before transitioning to less stable free-weight options.
There’s no reward for struggling with free weights before your joints and connective tissues are adequately prepared. The Smith machine acts as a valuable stepping stone, strengthening not only your prime movers but also the smaller, often overlooked stabilizing muscles that protect your shoulders.
Mastering Your Setup for Optimal Shoulder Activation ✨
Achieving next-level delts with the seated shoulder press isn’t just about lifting heavy; it’s about lifting smart. Proper setup and execution are non-negotiable for maximizing muscle activation and minimizing injury risk. Here are the critical elements to perfect:
1. The Crucial Seat Height
Seat height is arguably the most critical factor in your setup. An incorrect height can turn an effective exercise into an awkward, potentially shoulder-hostile movement. If the seat is too low, you’ll struggle to achieve a full range of motion and might compromise your lower back. If it’s too high, your range of motion will be cut short, limiting muscle engagement.
“Ideally, the handles or bar should begin around ear or shoulder level. This ensures you start the movement from a strong, advantageous position, allowing for a full and powerful press without excessive strain.” – Fitness Coach’s Tip
2. Wrist Alignment: Stacked and Strong
Just like in a bench press, your wrists are a vulnerable point if not properly aligned. Many trainees allow their wrists to fold backward under load, creating a significant stress point on the wrist tendons and forearm musculature. This can lead to pain and even injury over time.
The Fix: Keep your wrists straight and stacked directly over your forearms. Imagine a straight line from the weight through your palm, wrist, and forearm. This ensures the bones support the weight, rather than the delicate soft tissues of your wrist.
3. Elbow Position: Forward and Safe
The old-school behind-the-neck press, while once popular, has largely fallen out of favor due to its inherent risks. It forces the shoulders into an extreme external rotation, which can aggravate the joint, lead to impingement problems, and put undue stress on the rotator cuff.
The Safer Path: Keep your elbows slightly forward, not flared directly out to the sides. As you press, the bar or dumbbells should move in a natural arc slightly in front of your head, rather than directly overhead or behind it. This position is much more shoulder-friendly and allows for stronger, safer pressing.
4. Controlled Movement: The Power of Deliberation ❤️
Once you’ve set up, the execution must be deliberate and controlled. Avoid bouncing the weight or violently locking out your elbows at the top of the movement. The lowering phase, often called the eccentric phase, is not merely an intermission; it’s a vital component of the exercise where significant muscle growth and joint protection occur.
- Eccentric Control: Lower the weight slowly and under control. Aim for a 2-3 second lowering phase. This controlled descent places the muscles under tension for longer, stimulating more growth and improving joint stability.
- Smooth Press: Press the weight smoothly and powerfully upwards. Avoid using momentum.
- No Lockout: Stop just short of locking out your elbows at the top to maintain tension on the deltoids and protect your elbow joints.
Remember, shoulder injuries are notoriously stubborn and can linger for extended periods. Prioritizing control and deliberate movement is your best defense against them.
Why Shoulder Injuries Happen and How to Prevent Them 💧
Unlike a sore biceps or a bruised quad, an irritated shoulder tends to linger, often becoming a chronic issue. The shoulder joint’s incredible range of motion also makes it inherently less stable than other joints, making it susceptible to injury if not trained properly. Common culprits leading to shoulder pain include:
- Poor Form: As discussed, incorrect wrist and elbow positioning, along with excessive reliance on momentum, are primary drivers of injury.
- Lack of Warm-up: Jumping straight into heavy lifting without properly warming up the rotator cuff and shoulder girdle leaves the joint vulnerable.
- Imbalance: Over-training the anterior deltoids and neglecting the lateral and, particularly, the posterior deltoids and rotator cuff can lead to muscular imbalances that pull the shoulder out of alignment.
- Overuse/Overtraining: Too much volume or intensity without adequate recovery can lead to tendonitis or impingement.
- Ego Lifting: Attempting to lift weights beyond your current strength capabilities is a surefire way to compromise form and invite injury.
Preventing shoulder injuries is far easier than rehabilitating them. Focusing on proper technique, progressive overload, and balanced training is key. If you’re struggling with consistent exercise adherence, you might find valuable insights in Why Consistent Exercise Is So Hard and How to Fix It.
Practical Tips for Building Next-Level Delts 🥦
Beyond the seated shoulder press, incorporating a comprehensive approach will help you sculpt truly impressive and functional shoulders. Here are the most effective practical tips:
- Prioritize Progressive Overload: To build muscle, you must continually challenge your muscles. Gradually increase the weight, reps, or sets over time. Keep a workout log to track your progress and ensure you’re consistently getting stronger.
- Balance Your Deltoid Training: While the seated shoulder press hits the anterior delts hard, don’t neglect the side and rear heads. Include exercises like lateral raises (for side delts) and face pulls or reverse flyes (for rear delts and rotator cuff). A well-rounded approach prevents imbalances and promotes overall shoulder health.
- Warm-up Thoroughly: Before any shoulder workout, perform dynamic stretches and light rotator cuff activation exercises. Band pull-aparts, arm circles, and internal/external rotations with light weights are excellent for preparing the joint.
- Focus on Mind-Muscle Connection: Don’t just go through the motions. Actively think about squeezing your deltoids during each repetition. This mental focus can enhance muscle activation and growth.
- Master Your Core: A strong core provides a stable base for all upper body movements, including overhead presses. Incorporate core-strengthening exercises regularly. For more, check out How to Build a Stronger Core Anywhere (Complete Guide).
- Incorporate Compound and Isolation Movements: The seated shoulder press is a compound movement. Complement it with isolation exercises like lateral raises to specifically target and develop the side delts, which contribute significantly to shoulder width.
- Prioritize Recovery: Muscle growth happens during rest, not in the gym. Ensure adequate sleep, proper nutrition, and consider active recovery days. Overtraining can hinder progress and increase injury risk.
- Listen to Your Body: If you feel sharp pain, stop the exercise immediately. Differentiating between muscle soreness and joint pain is crucial. Don’t push through pain.
- Consider Your Age: As we age, muscle loss (sarcopenia) becomes a concern. For those over 35, strength training is even more critical. Read Why Strength Training After 35 Is Non-Negotiable (Complete Guide) for more insights.
Frequently Asked Questions 🌞
How often should I train my shoulders?
For most individuals, training shoulders 1-2 times per week with adequate rest in between sessions is sufficient for muscle growth. If you split your workouts, you might hit them directly once and indirectly through other pushing movements on another day. Always ensure your muscles have 48-72 hours to recover and rebuild.
Is it better to use dumbbells or a barbell for the seated shoulder press?
Both have their merits for building next-level delts. Dumbbells allow for a more natural range of motion and unilateral training, addressing potential strength imbalances between sides. Barbells often allow you to lift heavier weights, which can be great for progressive overload and overall strength gains. Incorporating both into your routine can offer comprehensive development.
Can I do seated shoulder presses if I have rotator cuff issues?
It depends on the severity and nature of your rotator cuff issue. In many cases, a well-executed seated shoulder press with light weight and strict form might be part of a rehabilitation program, but it’s crucial to consult with a physical therapist or healthcare professional before attempting it. They can assess your specific condition and provide personalized guidance to ensure safety and effectiveness.
What are some common mistakes to avoid during the seated shoulder press?
Common mistakes include flaring elbows out too wide, arching the lower back excessively, letting wrists extend backward, using too much weight with poor form, and not controlling the eccentric (lowering) phase. Always prioritize form over weight, and consider reviewing Why Your Home Workouts Are Falling Short and How to Fix It for general form advice.
Key Takeaways ✨
- Seated Shoulder Press is Foundational: It’s an excellent exercise for building next-level delts by isolating the shoulder muscles and providing a stable base.
- Form Over Everything: Proper seat height, wrist alignment, elbow positioning, and controlled movement are crucial for maximizing results and preventing injury.
- Start Smart: The Smith machine can be a valuable tool for beginners to learn mechanics and build foundational strength before moving to free weights.
- Balance is Key: Don’t neglect the lateral and posterior deltoids. Incorporate a variety of exercises to ensure balanced development and shoulder health.
- Listen to Your Body: Pay attention to pain signals and prioritize recovery. Shoulder injuries can be persistent.
- Progressive Overload: To continue building muscle, consistently challenge your muscles by gradually increasing weight, reps, or sets.
- Consult Professionals: Always seek advice from a healthcare professional or certified fitness coach, especially if you have pre-existing conditions or experience pain.
The Bottom Line
Building next-level delts requires dedication, intelligence, and a commitment to proper form. The seated shoulder press, when executed correctly, is an incredibly powerful tool in your arsenal for developing strong, well-rounded, and aesthetic shoulders. By understanding the anatomy, prioritizing safe and effective execution, and incorporating a balanced training approach, you can sculpt shoulders that not only look impressive but also contribute to overall functional strength and joint health. Remember, consistency and attention to detail are the true keys to unlocking your full potential. Always consult with a healthcare professional before starting any new exercise program.
Sources:
- The mechanisms of muscle hypertrophy and their application to resistance training
- Different shoulder exercises affect the activation of deltoid portions in resistance-trained individuals
- Front vs back and barbell vs machine overhead press: An electromyographic analysis
- Shoulder injuries attributed to resistance training
How Healthy Are Your Habits?
10 quick questions · Get your personal wellness score